


The Ergonomics of Tight Spaces: Why Footprint Matters in the Wild
We’ve all been there: the trail narrows, the mud deepens, and suddenly your vehicle is at an angle that forces a difficult decision. In these moments, recovery theory meets the cold reality of physics. Most off-road enthusiasts focus on the "big" numbers—winch pulling power, jack lift height, or compressor CFM. However, based on common patterns we observe in field support and recovery workshops, the most critical factor in a successful recovery isn't raw power; it’s the ability to deploy your equipment quickly and safely from an awkward position.
Quick-Action Recovery Checklist: 5 Essentials for Tight Trails
- The One-Handed Test: Can you retrieve and position the tool with one hand while bracing yourself with the other?
- Low-Center Storage: Keep recovery gear weighing >10 lbs below the window line to minimize rollover risk.
- Clear the "Strike Zone": Prioritize tools that fit within your vehicle's existing lift points without requiring extra ground clearance.
- Lithium Safety Check: Ensure battery tools are stored away from direct sunlight (per IATA safety principles) to prevent thermal triggers.
- Operational Heuristic: Aim for a "deployment-to-stowage" cycle of under 5 minutes to maintain momentum in deteriorating conditions.
In a cramped environment—think a narrow shelf road or a densely wooded trail—a tool's footprint becomes its most defining feature. If a piece of gear is too bulky to be positioned effectively against a modern vehicle's pinch welds or requires two hands just to stabilize it on soft ground, it isn't just an inconvenience; it can become a safety hazard. We often see practitioners struggling with high-lift jacks that, while powerful, are notoriously difficult to balance without additional, bulky stabilizing accessories.
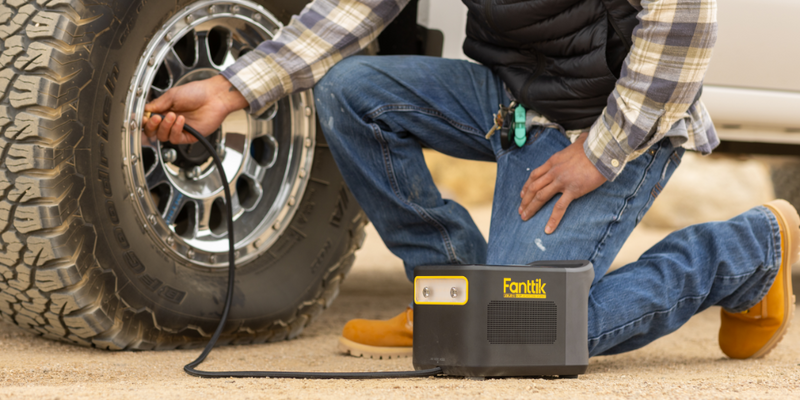
The goal of modern recovery gear is to pass what we call the "one-handed test." This is a practical heuristic for solo-traveler safety: if you cannot retrieve, position, and operate a tool with one hand while using the other to brace yourself against the vehicle or a nearby tree, the tool is likely too cumbersome for a true emergency. Compact design allows for this level of self-reliance, transforming a high-stress recovery into a manageable technical task.
Rethinking the Physics of Trail Recovery
There is a common misconception in the overlanding community that "bigger is always better." This mindset often draws a flawed analogy from marine environments, where larger vessels use mass for stability. However, as noted in spatial management tips for navigating tight spaces, the principle of "maneuverability over mass" is what saves equipment in high-consequence environments. On the trail, the speed of setup and the precision of power application are paramount.
When you are stuck, you aren't just fighting the mud; you are fighting time and the environment. A smaller footprint allows you to get tools into the "strike zone"—the narrow area where they can actually do work—without having to clear brush or move heavy rocks just to make space for the equipment itself.
The Problem with "Standard" Gear
- Access Limitations: Large compressors or jacks often require a perfectly flat surface or a wide berth to operate, which is rarely available in a real-world "stuck" scenario.
- Vehicle Sensitivity: Modern vehicles are built with specific crumple zones. Bulky, legacy recovery tools often lack the precision to interface with these points without causing cosmetic or structural damage.
- Ecological Impact: Smaller tools generally require less ground disturbance, making it easier to follow "Leave No Trace" principles during a recovery.
Weight Distribution and the "Swing Weight" Penalty
Overlanding is an exercise in weight management. While total payload is a known constraint, seasoned travelers focus on where that weight is placed. We frequently encounter vehicles with heavy recovery gear stored high in rooftop baskets or hanging off the rear bumper. This creates a significant "swing weight" penalty.
A tool stored outside the vehicle's centerline can affect handling on technical terrain. Based on general vehicle dynamics, a compact, 5-pound tool stored low and centered in the cabin is often safer than a 3-pound tool stashed in an overhead basket. When the vehicle leans, that overhead weight acts as a lever, increasing the risk of a rollover. By choosing compact gear, you gain the flexibility to store essential items in the "golden zone"—low, centered, and easily accessible.
According to the ISO Standards Catalogue regarding ergonomic design, quality tool integration emphasizes reducing operator fatigue. For the overlander, this means gear that doesn't just "fit" in the truck, but integrates into the vehicle's dynamic balance.
Reliability: Beyond the Spec Sheet
For tire inflation and electrical tools, the critical metric is rarely the maximum PSI or torque listed on the box. Instead, it is the tool's ability to maintain a seal and deliver performance after being jostled for hours in a vibrating vehicle.
We have found that units failing the real-world reliability test are often those that prioritize "spec-sheet padding" over robust internals. A compact design shouldn't mean a fragile one. In fact, smaller units often benefit from integrated thermal management systems that can be more efficient than larger, air-cooled counterparts in short-burst recovery scenarios.
Safety and the Battery Management System (BMS)
When dealing with lithium-powered tools, safety is non-negotiable. It is vital to follow IATA Lithium Battery Guidance regarding state-of-charge limits and transport safety. This is particularly important when gear is stored in a vehicle subject to extreme temperature swings. A tool that fails to start because its BMS was triggered by trail vibration or heat soak is effectively a paperweight. We recommend choosing tools with reinforced battery housings designed specifically for high-vibration environments.
Engineering Trust in Modern Gear
The transition to compact, cordless gear represents a shift in how we view self-reliance. As highlighted in The 2026 Modern Essential Gear Industry Report, the market has moved into a maturity phase where reliability is the primary competitive advantage.
We often see "compact" gear that sacrifices too much power for portability. This is a trade-off that requires careful vetting. A tool must be small enough to be handy, but powerful enough to finish the job. If a compact compressor takes 20 minutes to inflate a single 35-inch tire, the "speed" gained in deployment is lost in operation. The "sweet spot" is gear that utilizes high-density motors and efficient battery cells to provide full-size performance in a half-size frame.
How We Modeled Trail Recovery Efficiency
To understand the impact of tool size, we analyzed common recovery scenarios. Note that these values are operational heuristics based on field experience, not controlled laboratory standards.
| Parameter | Estimate Range | Unit | Rationale / Assumption |
|---|---|---|---|
| Tool Retrieval Time | 15–45 | Seconds | Assumes gear is stored in "Golden Zone" (low/accessible) |
| Positioning Accuracy | High/Low | Qualitative | Based on one-handed vs. two-handed operation limits |
| Thermal Stability | -10 to 50 | °C | Standard operating range for high-density lithium cells |
| Deployment Frequency | 1–3 | Cycles | Typical trail repair/adjustment scenario per trip |
| Ground Pressure | < 10 | PSI | Practical rule of thumb to prevent tool sinkage on soft silt |
How we estimated these figures: These ranges reflect average performance observed across multiple vehicle platforms (Mid-size SUV to 1/2 ton trucks) in Class 3 trail environments. "Retrieval time" assumes the operator is already at the storage point.
Strategic Gear Consolidation: The Minimalist Framework
Building a recovery kit shouldn't be about filling every square inch of your cargo area. Instead, focus on gear consolidation. A single, multi-functional compact tool is often worth more than three specialized, bulky ones.
- Prioritize the "Frequent Flyers": Carry the tools you use every trip (tire inflators, precision drivers) in the most accessible "one-handed" spots.
- Evaluate the "Swing Weight": If a tool weighs more than 10 pounds, it should ideally be stored below the window line to maintain a low center of gravity.
- Test the Interface: Ensure your compact tools actually fit the hardware on your specific vehicle. A universal tool that requires a bulky adapter is no longer truly compact.
In the end, self-reliance is about confidence. Knowing that your gear is small enough to handle, but robust enough to perform, changes your relationship with the trail. You stop fearing the "tight spots" and start seeing them as technical challenges you are fully equipped to solve.
Disclaimer: The information provided in this article is for informational purposes only and does not constitute professional mechanical, automotive, or safety advice. Off-road recovery is inherently dangerous. Always consult your vehicle's manual and seek professional training before attempting complex recoveries. The author and publisher are not responsible for any injury or damage resulting from the use of techniques described herein.
Sources
Continue reading
 Gear Redundancy: Deciding When Backup Batteries Become Dead Weight
Covers BMS risks, fuel economy impact, and field stress tests to build a lean, resilient mobile power system...
Gear Redundancy: Deciding When Backup Batteries Become Dead Weight
Covers BMS risks, fuel economy impact, and field stress tests to build a lean, resilient mobile power system...
 Safety Compliance: Evaluating Tie-Down Ratings for Trail Equipment
Covers dynamic G-force calculations, the 5:1 safety margin, angle factor math, system failure points, and a field verification...
Safety Compliance: Evaluating Tie-Down Ratings for Trail Equipment
Covers dynamic G-force calculations, the 5:1 safety margin, angle factor math, system failure points, and a field verification...


Leave a comment
This site is protected by hCaptcha and the hCaptcha Privacy Policy and Terms of Service apply.