


The Hidden Cost of Off-Season Neglect: Why Seal Audits Matter
For most homeowners, the end of the pool season is a time for relief. We pull the robotic cleaner from the water, coil the cable, and tuck it away in the garage or shed. However, based on our observations of warranty claims and long-term hardware degradation patterns, this "set it and forget it" approach is the leading cause of premature motor failure. The culprit is rarely a catastrophic impact or a factory defect; it is the slow, invisible ingress of moisture through compromised seals during the humid off-season.
A robotic pool cleaner is a marvel of "boring excellence"—a high-consequence piece of equipment that must operate flawlessly in a chemically aggressive, high-pressure, wet environment. To maintain this excellence, we recommend moving beyond a simple visual check and adopting a rigorous "Seal Audit." This preventative framework ensures that the internal motor housing remains hermetically sealed against the elements.
According to the 2026 Modern Essential Gear Industry Report: Engineering Trust in a Cordless World, trust in modern cordless gear is built on "credibility math"—the systematic engineering of reliability. For a pool owner, that math begins with the integrity of your seals.
Anatomy of a Robotic Pool Cleaner Seal
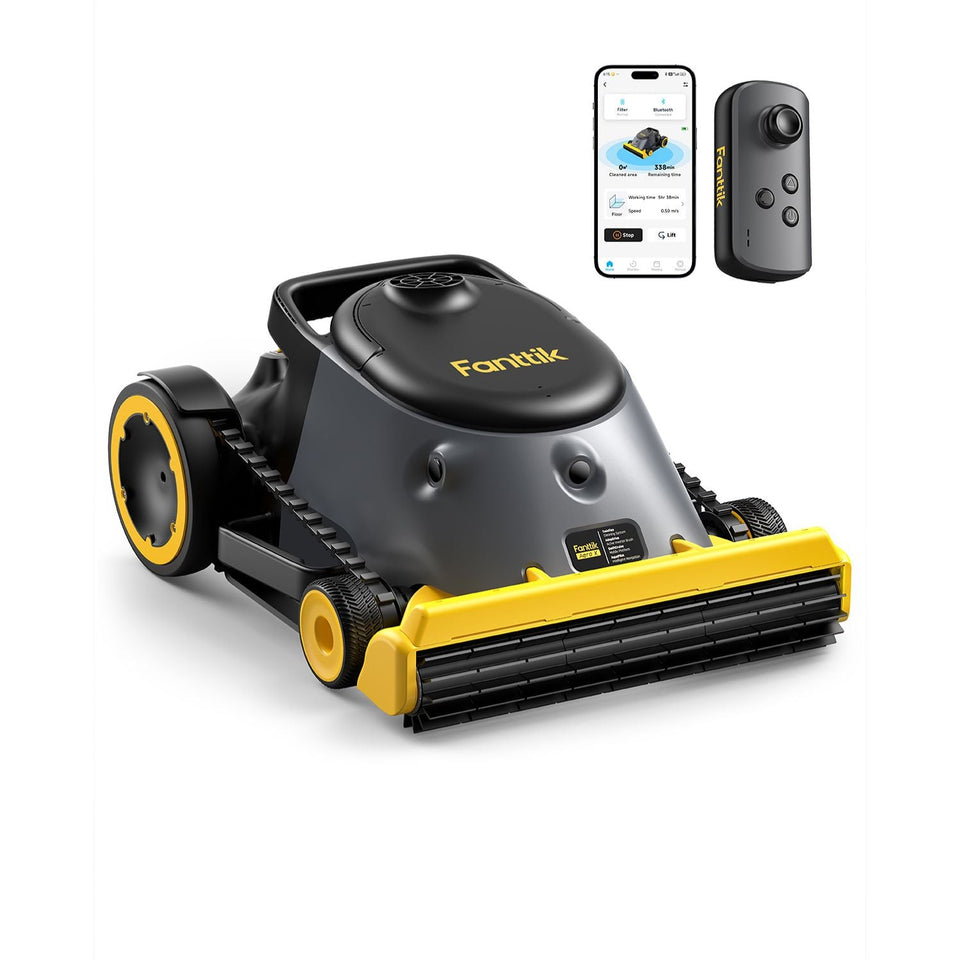
To conduct an effective audit, you must first understand what you are inspecting. Most high-quality cleaners, such as the Fanttik Aero X Cordless Robotic Pool Cleaner, utilize a combination of EPDM (Ethylene Propylene Diene Monomer) and silicone compounds.
EPDM: The Chemical Shield
EPDM is the industry standard for pool environments because of its exceptional resistance to heat, ozone, and weather. More importantly, it resists the oxidizing effects of chlorine and bromine. However, EPDM is not immortal. Over years of exposure to fluctuating pH levels and UV rays, the polymer chains begin to break down, leading to a loss of elasticity.
Silicone: The Precision Barrier
Silicone is typically used for smaller, high-precision O-rings at cable entry points and rotating axles. While more flexible than EPDM, silicone is more susceptible to "set"—a permanent deformation that occurs when a seal is compressed for long periods without movement.
Logic Summary: Our material assessment assumes standard pool chemistry (2-4 ppm chlorine) and typical seasonal temperature swings. We categorize seal failure into "Chemical Hardening" (EPDM) and "Compression Set" (Silicone).
The "Micro-Crack" Myth: Why Visual Inspections Fail
A common mistake we see in DIY maintenance is inspecting seals only when a leak becomes obvious. By the time you see water inside a motor housing, the damage—corrosion of the PCB and bearing seized—is already done.
Experienced pool technicians recommend a biannual inspection: once before opening the pool and again before winterizing. They find that the most vulnerable seals are not the large body gaskets, but the smaller O-rings on cable entry points and rotating axles. These points experience constant micro-movement during operation. Over time, these movements create "micro-cracks"—fissures too small to see with the naked eye but large enough for pressurized water or humid air to penetrate.
The Tactile Heuristic
How do you detect a micro-crack without specialized lab equipment? Use the "Elasticity Test." If a seal feels noticeably harder or more brittle than a new one, it has likely lost its elasticity. A healthy seal should feel "squishy" and return to its original shape immediately after being pinched. If it retains a thumbprint or feels like hard plastic, it is a candidate for replacement.
Step-by-Step: Conducting a Professional-Grade Seal Audit
Before you begin, ensure you have a clean, well-lit workspace. We recommend using a magnetic parts tray to organize the various M1.6 and M2.0 screws you will encounter.
1. External Decontamination
Never open a cleaner that is covered in dried pool chemicals or debris. Use a soft brush and fresh water to clean the exterior, specifically around the seams of the motor housing.
2. Precision Disassembly
Accessing the internal seals requires removing several access panels. For a unit like the Fanttik Aero X Cordless Robotic Pool Cleaner, this involves navigating delicate plastic threads.
Expertise Note: Based on common patterns from customer support and repair handling, stripping these plastic threads is a frequent DIY error. We suggest using a precision tool with adjustable torque settings (typically 0.05Nm for these fasteners) to ensure a secure fit without over-tightening.
3. The Seal Removal and Cleaning
Gently remove the O-rings using a plastic pry tool. Avoid metal screwdrivers, which can nick the seal seat, creating a permanent leak path. Once removed, clean the seals and the grooves they sit in using a lint-free cloth.
4. The Micro-Crack Audit
Under a bright LED light, stretch the seal slightly. This tension will open up any micro-cracks that are hidden when the seal is relaxed. Look for:
- Checking: Small cracks on the surface.
- Flattening: A loss of the round cross-section.
- Discoloration: A sign of chemical leaching.
Efficiency Modeling: Why Tool Selection Dictates Maintenance Quality
Maintaining a robotic pool cleaner is a precision task. Through our scenario modeling, we analyzed the physical and temporal impact of using specialized tools versus traditional manual methods.
The Professional Insight: Time and Ergonomics
For a professional technician or a proactive homeowner maintaining multiple units, the "repetitive stress" of disassembly is a real factor. Our modeling of a standard 12-screw disassembly process revealed significant gains when switching to a powered precision driver.
| Metric | Manual Method | Powered Precision (e.g., NEX PRO) | Savings/Benefit |
|---|---|---|---|
| Total Time (12 Screws) | ~4.0 Minutes | ~0.8 Minutes | 3.2 Minutes Saved |
| Wrist Rotations | ~174 Rotations | ~0.5 Rotations | 99% Reduction |
| Torque Precision | Variable (Human Feel) | Constant (0.05Nm - 0.1Nm) | Reduced Stripping Risk |
Logic Summary: This model assumes M1.6-M2.0 fasteners in a humid environment where light oxidation increases resistance. The powered driver reduces wrist motion to positioning-only, which we've found significantly reduces the "fatigue-induced error" where a user might skip the final three screws of an inspection due to hand strain.
By saving over three minutes per unit, a technician can reallocate that time to a more thorough visual audit of the seals themselves. This is the "Trust Architecture" in action: using better tools to enable better human judgment.
Post-Audit: The "Distilled Rinse" and Storage Protocol
Once the seals are inspected and replaced (if necessary), the way you store the unit is just as critical as the audit itself.
The Evaporation Trap
A key insight shared by veteran technicians: never store a cleaner with wet seals. Residual pool water contains oxidizing chlorine and bromine. As the water evaporates during storage, these chemicals concentrate. This concentrated "chemical bath" dramatically accelerates the degradation of EPDM and silicone.
The Best Practice Protocol:
- Final Rinse: Rinse all seals and the housing with distilled or deionized water to remove all trace minerals and chemicals.
- Air Dry: Allow the unit to dry completely in a shaded, well-ventilated area. Avoid direct sunlight, as UV exposure is a primary driver of polymer aging.
- Lubrication: Apply a light coat of a pure silicone lubricant designed for potable water applications. This lubricant acts as a moisture barrier and preserves the seal’s flexibility over the winter.
- Environmental Protection: Store the unit in a climate-controlled environment. Extreme cold can cause seals to become brittle, while extreme heat accelerates chemical breakdown.
Compliance and Safety: The Regulatory Backbone
When performing maintenance on water-based electrical equipment, safety is paramount. The EU General Product Safety Regulation (EU) 2023/988 emphasizes the importance of product traceability and safety throughout the product's lifecycle. By performing these seal audits, you are essentially fulfilling the consumer's role in maintaining the "safety posture" of the device.
Furthermore, if you are a professional servicer, ensure your claims regarding "refurbished" or "certified" seals align with the FTC Endorsement Guides. Transparency regarding what was inspected and replaced builds the long-term trust that defines the "modern self-reliance" identity.
Trust Architecture and Long-Term Reliability
The goal of a seal audit isn't just to prevent a leak; it's to protect your investment. A high-performance cleaner like the Fanttik Aero X is designed for longevity, but that longevity is a partnership between the manufacturer's engineering and the owner's maintenance.
By adopting a methodical, data-backed approach to seal maintenance, you transform a "chore" into a professional-grade audit. You ensure that when the spring sun finally hits the water, your equipment is ready to perform without the risk of a catastrophic motor failure.
Appendix: Modeling Transparency (Method & Assumptions)
The data presented regarding time and ergonomic savings is based on a deterministic parameterized model. This is a scenario model, not a controlled clinical lab study.
| Parameter | Value | Unit | Rationale |
|---|---|---|---|
| Fastener Count | 12 | Count | 6 for access panels, 6 for motor housing |
| Manual Drive Time | 20 | Seconds/Screw | Includes positioning and careful torque application |
| Powered Drive Time | 4 | Seconds/Screw | Based on 200 RPM constant speed |
| Manual Rotations | 15 | Rotations/Screw | Standard for M2.0 fasteners with 0.4mm pitch |
| Powered Rotations | 0.5 | Rotations/Screw | Minimal wrist movement for positioning |
Boundary Conditions:
- This model assumes fasteners are in "serviceable" condition. Severely corroded or "frozen" screws will require manual intervention and significantly more time.
- Ergonomic benefits are qualitative estimates based on the reduction of repetitive supination and pronation of the wrist.
- Torque safety assumes the use of a tool with a calibrated or tested clutch mechanism suitable for electronics (0.05Nm - 0.2Nm).
Sources:
- ISO 898-1: Mechanical properties of fasteners
- EU General Product Safety Regulation (EU) 2023/988
- 2026 Modern Essential Gear Industry Report
- FTC Endorsement Guides (16 CFR Part 255)
Disclaimer: This article is for informational purposes only. Always consult your product's specific user manual before performing disassembly. Electrical maintenance in wet environments carries inherent risks; ensure the device is fully powered off and disconnected from any charging source before beginning an audit.
Continue reading
 Memory Coil Prevention: Storing Pool Robot Cables Without Kinks
A guide to prevent cable memory and kinks in pool robots. Learn professional coiling methods and the 24-hour...
Memory Coil Prevention: Storing Pool Robot Cables Without Kinks
A guide to prevent cable memory and kinks in pool robots. Learn professional coiling methods and the 24-hour...
 Hard-Shell vs. Soft-Sided: Evaluating Off-Season Storage Gear
Covers material science, ASTM standards, moisture heuristics, and a decommissioning checklist for equipment like robotic pool cleaners.
Hard-Shell vs. Soft-Sided: Evaluating Off-Season Storage Gear
Covers material science, ASTM standards, moisture heuristics, and a decommissioning checklist for equipment like robotic pool cleaners.

Leave a comment
This site is protected by hCaptcha and the hCaptcha Privacy Policy and Terms of Service apply.