


Download the official Fanttik T1 Max soldering iron manual PDF, or use the verified quick-start below. This page owns manual and specification searches; the separate T1 Max operating guide gives the full first-session walkthrough, while the troubleshooting guide covers abnormal heating and charging.
Where to Find the T1 Max Manual
Fanttik publishes the official user manual as a downloadable PDF — no registration required:
- PDF download: Fanttik T1 Max User Manual PDF
- In the box: A printed quick-start guide ships with the kit.
- Support hub: fanttik.com/pages/contact-us lists product documentation and warranty contact.
The PDF covers full safety warnings, tip compatibility, and temperature charts; the printed card covers only first-time setup. If your iron behaves unexpectedly, check the PDF before troubleshooting.
Quick Spec Sheet
| Parameter | Fanttik T1 Max |
|---|---|
| Heat-up time | ~7 seconds |
| Temperature range | 390°F–840°F |
| Temperature control | 6 levels |
| Cordless mode | 2600mAh battery, 11W, ~60 min runtime |
| Corded mode | USB-C (Type-C), 16W, 7s melt |
| Idle protection | Auto sleep |
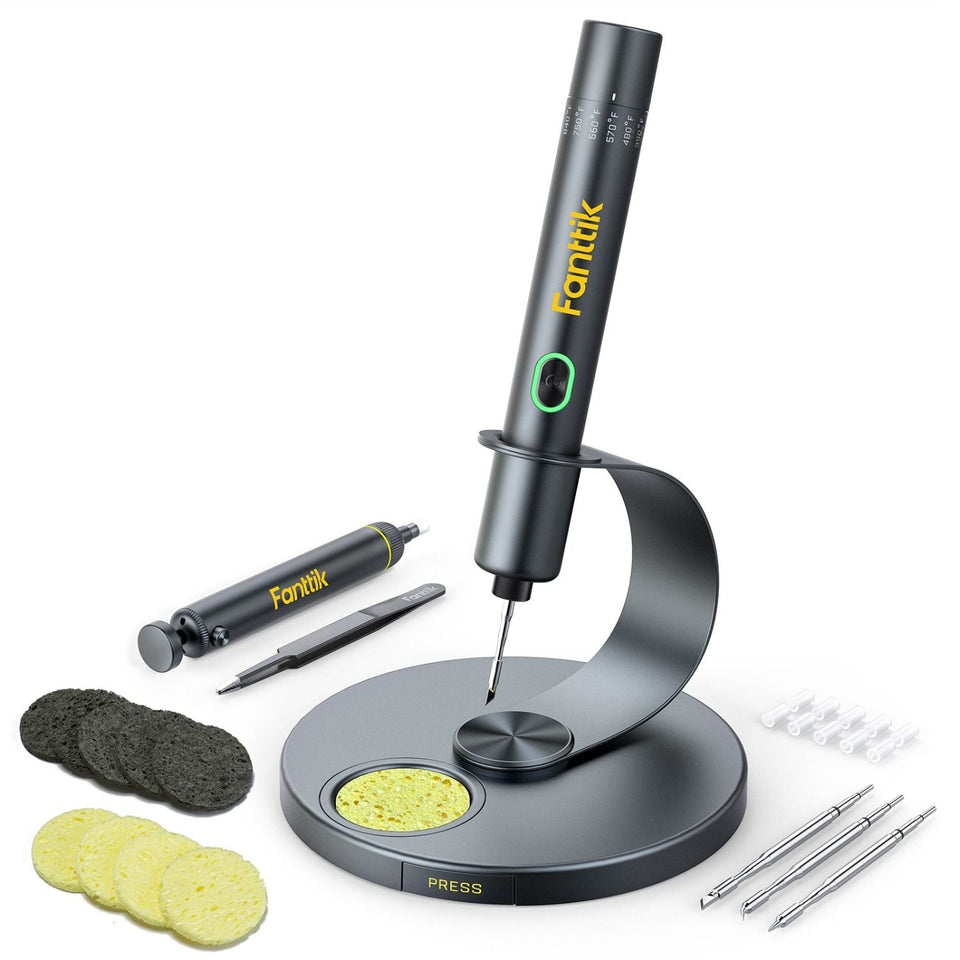
| Included tips | 4 × C210 precision tips |
| Stand | 360° swivel stand |
| Charging | USB-C |
| Price | $79.99 |
Quick-Start Steps
- Charge before first use. Connect the included USB-C cable to the T1 Max and a USB-C wall brick. The indicator shows charging status and changes state when full. You can also run the iron corded over USB-C while plugged in.
- Install a tip. Seat one of the four C210 tips fully into the heating element before powering on. A tip that isn't fully bottomed will heat slowly and unevenly. Let the iron cool fully before touching the tip.
- Power on and pick a temperature level. The T1 Max offers 6 temperature levels across the 390°F–840°F range. It reaches working heat in roughly 7 seconds, so wait for the display to confirm before soldering.
- Tin the tip. When the tip reaches temperature, apply a small amount of solder to coat it. A tinned tip transfers heat efficiently and lasts longer.
- Rest it on the swivel stand. Between joints, set the iron on its 360° swivel stand. Auto sleep lowers the temperature when the iron is left idle to protect the tip and save battery.
Temperature Settings
The T1 Max steps through 6 levels between 390°F and 840°F. Use a lower setting for delicate work and a higher setting for larger thermal masses. General guidance:
- Lower range: Fine electronics, surface-mount components, and heat-sensitive parts where you want to avoid lifting pads.
- Mid range: General through-hole work, header pins, and standard leaded or lead-free solder on small joints.
- Higher range: Larger pads, ground planes, thick wires, and connectors that pull heat away quickly.
If solder isn't flowing, step up one level rather than pressing harder — most cold joints come from too little heat, not too little pressure. If you smell burning flux or the tip oxidizes quickly, you're running hotter than the job needs.
Cordless vs. Corded Mode
The T1 Max works two ways. In cordless mode it runs on its 2600mAh battery at 11W for roughly 60 minutes of use, which is enough for most desk and field repairs without a cable in the way. In corded mode, plugged into USB-C, it draws up to 16W and reaches melt in about 7 seconds — useful for longer sessions or higher-heat joints. You can solder while charging; if the battery is depleted, plug in and the iron runs corded.
Changing Tips
The T1 Max uses C210 precision tips. The kit includes four, and the C210 line (such as C210-I, C210-IS, and C210-K) covers fine-point, bevel, and knife profiles for different joint types.
- Power off and let the tip cool completely — a hot tip will burn you and can damage the cartridge if pulled under tension.
- Pull the cooled tip straight out of the heating element.
- Push the new C210 tip in until it is fully seated; a tip that sits proud will heat poorly.
- Power on, set your temperature level, and re-tin the new tip before soldering.
For a full tip-by-tip breakdown and replacement options, see the Fanttik soldering iron tip replacement guide.
Charging & Safety
Charge via USB-C before first use. Use a power-delivery cable; a data-only cable may trickle or not charge at all.
- Never touch the tip while the iron is on or cooling — soldering tips reach hundreds of degrees and stay hot after power-off.
- Always return the iron to its swivel stand when not in your hand; don't lay a hot iron on a bench.
- Solder in a ventilated area and avoid breathing flux fumes.
- Let auto sleep do its job — leaving the iron at full heat unattended shortens tip life.
- Keep the tip tinned; a dry, oxidized tip won't transfer heat even at the right temperature setting.
FAQ
Q: Where do I download the T1 Max manual PDF?
A: Directly from Fanttik's servers. No sign-up required.
Q: What is the temperature range and how do I set it?
A: The T1 Max covers 390°F–840°F across 6 temperature levels. Power on and step through the levels to your target, then wait for the display to confirm — it heats in about 7 seconds.
Q: Can I use the T1 Max while it's charging?
A: Yes. It runs corded over USB-C at up to 16W, so you can solder while plugged in or when the battery is depleted.
Q: What tips does it use?
A: C210 precision tips. The kit includes four, and the C210 line covers fine-point, bevel, and knife profiles.
Q: How long does the battery last per charge?
A: Cordless mode runs at 11W on a 2600mAh battery for roughly 60 minutes of use. Switch to corded USB-C for longer sessions.
Q: My T1 Max won't heat or won't turn on — what should I check?
A: Confirm the tip is fully seated, charge the battery or plug in over USB-C, and verify your cable supports charging. For other issues, see the T1 Max troubleshooting guide.
Related Support
- Fanttik T1 Max Troubleshooting Guide — full issue index for the T1 Max.
- How to Use a Fanttik Soldering Iron — step-by-step soldering technique and best practices.
- Fanttik Soldering Iron Tip Replacement — C210 tip profiles and how to swap them.
- Fanttik T1 Max product page — full specifications and purchasing.
- Fanttik Support Center — warranty, contact, and all product documentation.
Leave a comment
This site is protected by hCaptcha and the hCaptcha Privacy Policy and Terms of Service apply.