


To use the Fanttik T1 Max, fully seat a C210 tip, power on, choose a temperature level, tin the heated tip, solder the joint, then let the iron cool in its stand. This page is the operating walkthrough. Download the official PDF from the T1 Max manual page, or use the troubleshooting guide if the iron does not heat or charge normally.
Quick Spec Sheet
| Feature | Fanttik T1 Max |
|---|---|
| Heat-up time | About 7 seconds |
| Temperature range | 390°F – 840°F |
| Temperature levels | 6 levels |
| Cordless battery | 2600 mAh built-in, up to 60 min run time |
| Corded mode | Type-C powered, higher sustained output |
| Auto Sleep | Yes — gravity sensor sleeps the tip after 30 seconds at rest |
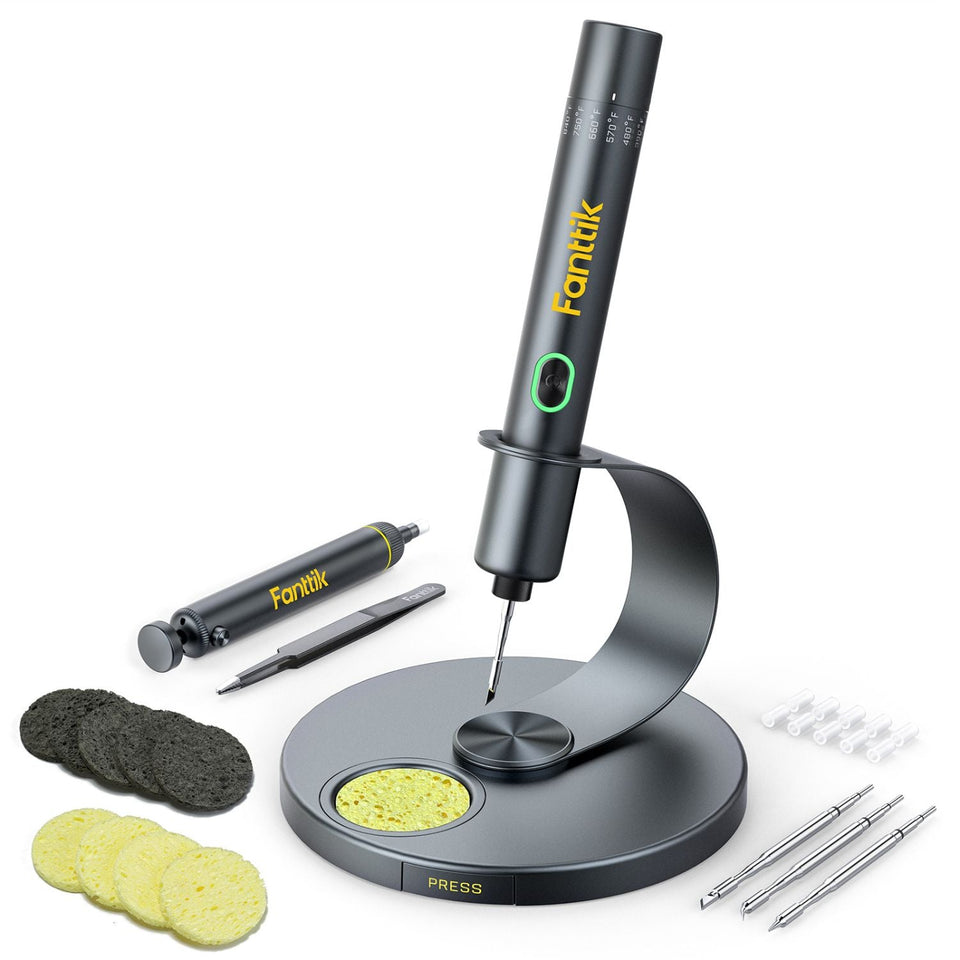
| Included tips | 4 × C210 precision tips |
| Stand | 360° swivel stand |
| Charging port | USB-C |
What the Indicator Light Means
The T1 Max uses a single LED to tell you its state. Learn these three colors before your first use:
- Red — the tip is heating, or the battery is low.
- Green — the iron is asleep, or it has reached your set temperature and is ready to work.
- White — the unit is charging, or charging is complete.
Before You Start: Charge and Prepare
Out of the box, top up the battery over USB-C until the indicator shows a full charge (white). You can also work in corded mode with the cable plugged in, which is the better choice for longer sessions or heavier joints because the iron draws sustained power instead of leaning on the battery. Choose a tip that matches your work — the kit ships with four C210 precision tips. A fine conical or bent tip suits SMD and fine-pitch work; a chisel or knife profile moves more heat for larger pads and through-hole joints. Seat the tip fully before powering on.
Step-by-Step: Using the T1 Max
- Insert your tip. Push the chosen C210 tip fully into the handle until it seats. A loose or partially inserted tip heats slowly and reads the wrong temperature.
- Power on. Press the button to wake the iron. The LED turns red as the tip begins heating — the T1 Max reaches working temperature in about 7 seconds.
- Set your temperature. The T1 Max offers 6 temperature levels across its 390°F–840°F range. Use a lower level for delicate components and a higher level for ground planes or larger pads that pull heat away. When the LED turns green, the tip is at temperature and ready.
- Tin the tip. Touch a little fresh solder to the tip until it has a thin, shiny coat. A tinned tip transfers heat far better than a dry, oxidized one and is the single biggest factor in clean joints.
- Heat the joint, not the solder. Press the tip against both the pad and the component lead for a moment, then feed solder into the joint — not onto the tip. Let the heated metal melt the solder so it flows and wets properly.
- Remove and inspect. Pull the solder away first, then lift the tip. A good joint is smooth and slightly concave, not a dull blob. Re-tin the tip between joints as needed.
- Let Auto Sleep work. When you set the iron in its 360° swivel stand, the built-in gravity sensor triggers sleep after about 30 seconds and the LED turns green. Picking it up wakes it and it reheats quickly — this protects the tip and saves battery.
- Power down and store. When you're finished, re-tin the tip to protect it, then power off. Let the tip cool fully before packing the kit away.
Cordless vs. Corded: Which to Use
For quick fixes and working away from an outlet, the built-in 2600 mAh battery gives you up to 60 minutes of cordless run time. For a long bench session, or when soldering larger joints that demand steady heat, plug in the USB-C cable and work in corded mode — the iron sustains output better on the cable and you never pause to recharge. You can charge and use it at the same time if your power source supplies enough current.
Tips for Clean Results
- Keep the tip tinned. A bright, wetted tip is the key to fast, reliable heat transfer. Wipe on a damp sponge or brass wool, then re-tin.
- Match tip to task. Swap among the included C210 tips rather than forcing one profile to do everything.
- Don't overheat. Higher isn't always better. Use the lowest level that flows your solder cleanly to avoid lifting pads or cooking components.
- Let Auto Sleep protect the tip. Don't defeat the rest cycle — idling at full heat shortens tip life.
FAQ
Q: How long does the T1 Max take to heat up?
A: About 7 seconds to reach working temperature from a wake. When the LED turns green, it is ready to solder.
Q: What do the light colors mean?
A: Red is heating or low battery, green is asleep or ready at temperature, and white is charging or charge complete.
Q: Can I use it while it's plugged in?
A: Yes. Corded mode over USB-C is recommended for longer sessions and heavier joints because it delivers steadier power than running on battery alone.
Q: Why did the tip cool down on its own?
A: That is Auto Sleep. The built-in gravity sensor puts the iron to sleep after about 30 seconds at rest and the LED turns green. Pick it up to wake it; it reheats in seconds.
Q: Which tip should I use?
A: The kit includes four C210 precision tips. Use a fine point for small SMD work and a broader chisel-style tip for larger pads and through-hole joints that need more heat.
Q: How long does a cordless charge last?
A: The built-in 2600 mAh battery supports up to 60 minutes of run time. For anything longer, switch to corded mode.
Related Support
- Fanttik T1 Max Soldering Iron Manual — full setup, settings, and where to find the manual
- Fanttik T1 Max Troubleshooting Guide — heating, charging, and tip issues with fixes
- Fanttik Soldering Iron Tip Replacement — how to swap and care for C210 tips
- Fanttik T1 Max Soldering Iron Kit product page
- Fanttik Support Center
Continue reading
 Fanttik T1 Max Soldering Iron Manual PDF & Quick Start
Download the official Fanttik T1 Max soldering iron manual PDF. Find verified temperature settings, C210 tip changes, charging...
Fanttik T1 Max Soldering Iron Manual PDF & Quick Start
Download the official Fanttik T1 Max soldering iron manual PDF. Find verified temperature settings, C210 tip changes, charging...
 Fanttik X9 Pro Manual & Quick-Start Guide
Download the Fanttik X9 Pro manual PDF and learn quick-start setup: charging, target pressure with auto-stop, the 4...
Fanttik X9 Pro Manual & Quick-Start Guide
Download the Fanttik X9 Pro manual PDF and learn quick-start setup: charging, target pressure with auto-stop, the 4...
Leave a comment
This site is protected by hCaptcha and the hCaptcha Privacy Policy and Terms of Service apply.